DIY Kitchen Cabinet Installation: Setting Door Handles
Introduction
Installing door handles on your kitchen cabinets is a crucial step in the DIY cabinet installation process. It’s not only about aesthetics but also functionality. Properly set door handles can make your cabinets easier to use and enhance the overall look of your kitchen. In this comprehensive guide, we’ll address the ten most commonly asked questions about setting door handles for DIY kitchen cabinet installation.
Question 1: Where should I place door handles on my kitchen cabinets?
When determining the placement of door handles on your kitchen cabinets, you’ll want to strike a balance between functionality and aesthetics. Here are some guidelines to consider:
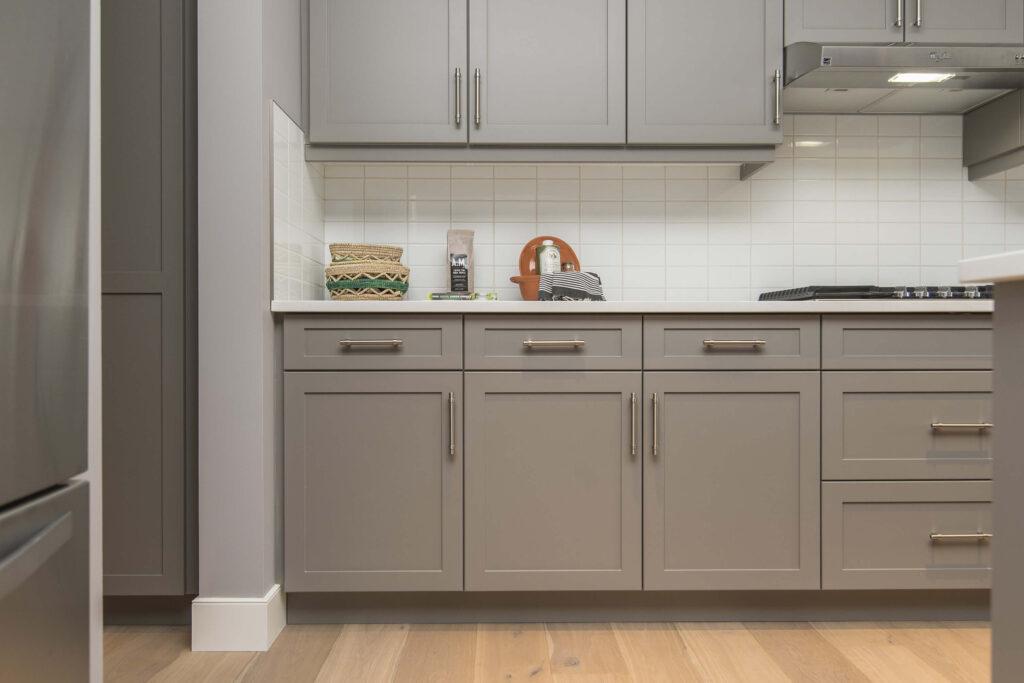
- Vertical vs. Horizontal: Handles can be placed either vertically or horizontally. Vertical handles are commonly centered on the cabinet door, while horizontal handles are often centered horizontally or slightly above the center.
- Consistency: Maintain a consistent height and position for handles across all your cabinets for a cohesive look.
- Comfort: Ensure that the handle placement feels comfortable when you grasp it. Consider the size of your hands and how you’ll be using the cabinets.
- Style: The style of your cabinets can influence handle placement. Modern cabinets may have minimalist handles centered horizontally, while traditional cabinets might have handles higher up.
- Test It: Before drilling holes, use adhesive putty or painter’s tape to simulate handle placement and see how it feels and looks.
Remember that there are no hard-and-fast rules, so trust your judgment and preferences when deciding on the handle placement for your kitchen cabinets.
Question 2: What tools do I need to install door handles on kitchen cabinets?
Before you begin installing door handles on your kitchen cabinets, gather the necessary tools and materials. Here’s a list of items you’ll typically need:
- Screwdriver: A screwdriver with the appropriate bit for your handle screws.
- Measuring Tape: To ensure precise handle placement.
- Pencil: For marking the drill holes.
- Drill: To create holes for the screws.
- Level: To make sure your handles are straight.
- Template: Some handles come with a template for hole placement.
- Safety Gear: Safety glasses and gloves for protection.
Having these tools ready will make the installation process smoother and more efficient.
Question 3: How do I measure and mark the door handle placement accurately?
Accurate measurement and marking are crucial for proper door handle installation. Follow these steps to ensure precision:
- Measure Cabinet Width: Determine the width of your cabinet door and divide it in half to find the center point.
- Handle Length: Measure the length of your handle, including the screws.
- Handle Position: Place the handle on the center point, ensuring it’s level. Mark the hole positions with a pencil.
- Spacing: If you have multiple doors with handles, maintain consistent spacing between them.
- Double-Check: Use a measuring tape and a level to double-check your marks before drilling.
Taking the time to measure and mark accurately will result in a professional-looking installation.
Question 4: Should I use a template for door handle installation?
Using a template can be a helpful shortcut for door handle installation, especially if you have numerous cabinets to work on. Many handle manufacturers provide templates with pre-marked hole placements. Here’s how to use one:
- Align the Template: Position the template on the cabinet door where you want the handle.
- Secure It: Use painter’s tape or adhesive putty to hold the template in place.
- Drill Holes: Drill through the holes in the template to create the screw holes.
- Remove Template: Gently remove the template, and you’ll have perfectly aligned holes for your handle.
Templates can save you time and ensure consistency in handle placement.
Question 5: What size drill bit should I use for door handle installation?
Choosing the correct drill bit size is crucial to ensure a secure and snug fit for your door handles. Here’s how to determine the right size:
- Check Handle Screws: Look at the screws that came with your handles. The size of the screws will determine the drill bit size.
- Test Fit: Before drilling into your cabinet doors, perform a test fit by drilling a hole in a scrap piece of wood with the chosen drill bit. Ensure the screw fits snugly but isn’t too tight.
- Depth: Pay attention to the depth of the hole you drill. It should be slightly shorter than the length of the screws.
Using the correct drill bit size will prevent issues with handle installation and keep your cabinets looking neat.
Question 6: How do I install door handles on cabinet doors with different thicknesses?
If you have cabinet doors of varying thicknesses, you’ll need to adjust your handle installation technique accordingly. Here’s what to do:
- Measure Each Door: Determine the thickness of each cabinet door individually.
- Drill Depth: Adjust the depth of your drill hole based on the thickest door. Make sure the screws won’t protrude on thinner doors.
- Select Screws: Choose screws that are long enough to secure the handle on the thickest door but won’t poke through the thinnest door.
- Test Fit: Always perform a test fit on the thickest door to ensure the screws are the correct length and won’t damage the other doors.
By accommodating varying door thicknesses, you’ll achieve a uniform and professional look across all your cabinets.
Question 7: Can I install door handles on frameless cabinets?
Yes, you can install door handles on frameless cabinets, but the process may differ slightly from framed cabinets. Here’s how to do it:
- Determine Door Material: Frameless cabinets can have various door materials, such as wood, laminate, or glass. Consider the material when selecting installation tools and techniques.
- Mark Hole Placement: Measure and mark the desired handle placement on the door.
- Prevent Splintering: If you have a delicate door material like glass, use masking tape or painter’s tape on the area where you’ll drill to prevent splintering.
- Drill Carefully: Use a drill with a carbide-tipped bit to create holes for the screws. Go slowly and apply gentle pressure to avoid damaging the door.
- Secure Handles: Attach the handles securely, following the same guidelines as for framed cabinets.
Frameless cabinets can look stunning with the right door handles, so take your time to install them properly.
Question 8: What’s the best way to clean and maintain door handles on kitchen cabinets?
Keeping your door handles clean and well-maintained is essential for their longevity and appearance. Here are some tips:
- Regular Cleaning: Wipe down your handles with a damp, soft cloth regularly to remove fingerprints and grease buildup.
- Mild Cleaning Solutions: If your handles are particularly dirty, use a mild dish soap diluted in water. Avoid abrasive cleaners that can damage the finish.
- Avoid Harsh Chemicals: Do not use harsh chemicals or abrasive pads, as they can scratch or dull the handle’s finish.
- Inspect for Loose Screws: Periodically check if the screws securing the handles are tight. If they’re loose, tighten them to prevent wobbling or damage.
- Consider Handle Material: Different handle materials may require specific cleaning and maintenance. Follow the manufacturer’s recommendations.
Proper care will ensure your cabinet door handles remain in excellent condition for years to come.
Question 9: Can I install door handles on cabinet drawers in the same way as doors?
Yes, you can install door handles on cabinet drawers using a similar process as you would for cabinet doors. However, there are some considerations:
- Drawer Type: Consider the type of drawer you have. Full-extension drawers, for example, may require handles positioned slightly differently than regular drawers.
- Placement: Handle placement on drawers is often centered horizontally, but you can adjust it based on your preferences.
- Drawer Front: Be mindful of the drawer front’s material. Solid wood fronts are more forgiving for drilling holes than veneer or laminate.
- Test Fit: Always perform a test fit to ensure the handle placement feels comfortable when opening and closing the drawers.
Installing handles on cabinet drawers can enhance both the functionality and aesthetics of your kitchen.
Question 10: How do I fix a loose or wobbly door handle on kitchen cabinets?
Over time, door handles on kitchen cabinets can become loose or wobbly due to regular use. Here’s how to fix the issue:
- Remove Handle: Carefully unscrew and remove the loose handle from the cabinet door.
- Tighten Screws: Inspect the screws and tighten them. If the screws are stripped or damaged, replace them with new ones of the same size.
- Use Threadlocker: Apply a small amount of threadlocker (a type of adhesive) to the screw threads before reattaching the handle. This will help prevent future loosening.
- Reattach Handle: Screw the handle back into place, making sure it’s secure and doesn’t wobble.
Regularly check your cabinet handles for any signs of loosening and address the issue promptly to maintain their functionality and appearance.
In conclusion, installing door handles on your kitchen cabinets may seem like a small detail, but it can greatly impact the overall look and usability of your kitchen. By following these guidelines and addressing common questions, you can achieve a professional and functional result in your DIY kitchen cabinet installation project. Whether you’re a seasoned DIY enthusiast or a beginner, proper handle installation is an essential skill to master for a successful kitchen renovation.
Question 11: What are some popular materials and finishes for kitchen cabinet door handles?
Choosing the right materials and finishes for your cabinet door handles can significantly impact the overall aesthetics of your kitchen. Here are some popular options to consider:
- Stainless Steel: A timeless choice, stainless steel handles are durable, resistant to corrosion, and come in various finishes, including polished, brushed, and matte.
- Brass: Brass handles add a touch of warmth and luxury to your kitchen. They can develop a beautiful patina over time, giving a unique character to your cabinets.
- Chrome: Chrome handles offer a sleek and modern look. They are highly reflective and easy to clean, making them suitable for contemporary kitchen designs.
- Bronze: Bronze handles come in various shades and finishes, from oil-rubbed to antique bronze. They can complement both traditional and rustic kitchen styles.
- Wood: Wooden handles provide a natural and rustic feel. They are a great choice for country or farmhouse kitchens.
- Acrylic or Glass: For a modern and minimalist look, consider acrylic or glass handles. They are available in various colors and shapes.
- Ceramic: Ceramic handles offer a wide range of decorative patterns and colors. They can add a charming and vintage touch to your cabinets.
- Leather: Leather-wrapped handles are unique and bring a sense of sophistication to your kitchen. They are available in various colors to match your decor.
The choice of material and finish should align with your kitchen’s style and your personal preferences.
Question 12: Are there any guidelines for selecting the right handle size for my kitchen cabinets?
Selecting the right handle size is essential for both aesthetics and functionality. Here are some guidelines to help you choose the appropriate size:
- Consider Cabinet Size: Larger cabinets typically require larger handles, while smaller cabinets work well with smaller handles. This creates a balanced look.
- Proportions: The handle size should be proportional to the cabinet door or drawer. It should neither overpower nor get lost on the surface.
- Grip Comfort: Ensure the handle offers a comfortable grip. It should be easy to grasp and use.
- Drawer Depth: For deep drawers, consider longer handles to make them more accessible.
- Knob vs. Pull: Knobs are smaller and are often used for cabinet doors, while pulls are longer and work well for drawers.
- Consistency: Maintain consistency in handle size across all your cabinets for a cohesive appearance.
- Style: The style of your cabinets can also influence handle size. Modern kitchens often feature longer, sleek handles, while traditional kitchens may have smaller, decorative knobs.
Ultimately, the right handle size should complement your kitchen’s design and make cabinet use comfortable.
Question 13: Can I mix and match different handle styles in my kitchen?
Mixing and matching different handle styles can add a unique and personalized touch to your kitchen. However, it should be done thoughtfully to achieve a cohesive look. Here are some tips:
- Consistent Finish: Stick to a consistent finish for all your handles. This ensures a harmonious appearance even when using different styles.
- Limited Variety: Avoid using too many different handle styles. Stick to two or three at most to maintain visual consistency.
- Placement: Consider where you’ll use each handle style. For example, you might use one style for upper cabinets and another for lower cabinets or drawers.
- Theme: If you’re going for a specific theme, such as vintage or eclectic, mixing handle styles can enhance the theme.
- Color Coordination: Ensure that the handle colors or materials coordinate with other elements in your kitchen, such as faucets or appliances.
- Trial Run: Before committing, try out different handle combinations using adhesive putty or painter’s tape to see how they look and feel.
Mixing and matching handles can be a creative way to personalize your kitchen, but it’s essential to maintain a sense of unity in your design.
Question 14: How can I create a seamless look for handleless cabinets?
Handleless cabinets have become increasingly popular in modern kitchen designs. To achieve a seamless look, you can consider the following options:
- Integrated Handles: Some handleless cabinets feature integrated handles, where a groove or channel is carved into the cabinet door to serve as a handle. This creates a sleek and minimalist appearance.
- Push-to-Open Mechanism: Install a push-to-open mechanism that allows you to open cabinet doors and drawers with a gentle push. This eliminates the need for visible handles altogether.
- Edge Pulls: Use edge pulls or finger pulls that are discreet and blend into the cabinet design. They provide a small lip or groove for your fingers to grip.
- Hardware Placement: If you prefer a truly handleless look, you can place the hardware, such as knobs or pulls, on the interior or hidden sides of cabinet doors for a concealed appearance.
- Custom Solutions: Consult with a kitchen designer or cabinet maker for custom handleless options that suit your design preferences.
Creating a seamless look for handleless cabinets involves careful planning and attention to detail, but the result can be a modern and elegant kitchen design.
Question 15: What are the considerations for childproofing cabinet handles in the kitchen?
Childproofing your kitchen cabinet handles is essential to ensure the safety of young children. Here are some considerations:
- Childproof Locks: Install childproof locks or latches on cabinets and drawers to prevent children from accessing potentially dangerous items.
- Handle Selection: Choose handles that are more challenging for young children to grasp or manipulate, such as those with a more complex design or shape.
- Height: Consider the height at which you install handles. Place them out of reach of small children.
- Childproofing Straps: Use childproofing straps to secure cabinet doors and drawers closed.
- Educate: Teach children about the hazards in the kitchen and the importance of not playing with cabinet handles.
- Supervision: Always supervise young children in the kitchen, especially when cooking or using appliances.
Childproofing your kitchen handles is a crucial step in ensuring a safe environment for your family.
Question 16: How can I remove and replace cabinet door handles?
If you want to update the look of your kitchen or replace old handles, here’s how to remove and replace cabinet door handles:
- Remove Old Handles:
- Unscrew and remove the old handles using a screwdriver or drill.
- Fill any holes or gaps from the old handles with wood filler and sand it smooth if necessary.
- Measure and Mark:
- Measure and mark the desired placement for the new handles.
- Drill New Holes:
- Use the appropriate drill bit to create holes for the new handles. Double-check the measurements to ensure accuracy.
- Attach New Handles:
- Screw the new handles into place, ensuring they are secure.
- Check Alignment:
- Use a level to ensure that all handles are properly aligned.
- Final Adjustments:
- Make any final adjustments to the handle placement if needed.
This process allows you to update the look of your kitchen cabinets with new handles, providing a fresh and updated appearance.
Question 17: Can I install door handles on laminate or veneer cabinet doors?
Yes, you can install door handles on laminate or veneer cabinet doors, but you need to be cautious to prevent damage to the surface. Here’s how to do it:
- Marking: Measure and mark the desired handle placement on the door.
- Protection: To prevent chipping or splintering, place painter’s tape or masking tape over the area where you’ll drill.
- Drill Slowly: Use a sharp drill bit and drill slowly, applying gentle pressure. Ensure the drill is perpendicular to the door surface.
- Depth: Drill to the appropriate depth for the screws without going too deep.
- Install Handles: Screw the handles into place.
By taking these precautions and drilling carefully, you can install handles on laminate or veneer cabinet doors without causing damage.
Question 18: Are there any eco-friendly options for kitchen cabinet handles?
Yes, there are eco-friendly options for kitchen cabinet handles if you’re conscious of sustainability. Here are some eco-friendly handle options to consider:
- Bamboo: Handles made from bamboo are a sustainable choice as bamboo is a fast-growing and renewable resource.
- Recycled Materials: Look for handles made from recycled materials, such as recycled glass or metal.
- Upcycled Handles: Consider repurposing vintage or antique handles, giving them a new life in your kitchen.
- Local Artisans: Support local artisans who craft handles using sustainable materials and practices.
- Reclaimed Wood: Handles made from reclaimed wood are both environmentally friendly and add rustic charm to your kitchen.
When choosing eco-friendly handles, inquire about the materials’ sources and manufacturing processes to ensure they align with your sustainability goals.
In conclusion, setting door handles for your DIY kitchen cabinet installation is a crucial step that involves various considerations, from handle materials and finishes to placement and childproofing. By addressing these common questions and following best practices, you can achieve a functional, aesthetically pleasing, and safe kitchen cabinet handle installation. Whether you’re renovating your kitchen or simply updating its look, the choice and installation of door handles play a significant role in the overall design and functionality of your space.
Read: Selecting Countertop Materials for DIY Kitchen Cabinet Installation
Read: Hanging Doors and Drawers for DIY Kitchen Cabinet Installation
