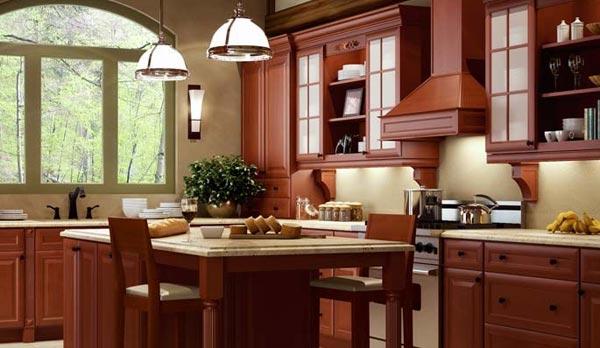
Exploring the Pros of DIY Kitchen Cabinet Installation
In this comprehensive guide, we will delve into the world of DIY kitchen cabinet installation, focusing on the most commonly asked questions and their detailed answers. If you’re considering taking on this home improvement project, you’re in the right place. We’ll cover everything from the benefits of DIY cabinet installation to the tools you’ll need and the step-by-step process. Let’s get started!
Question 1: What are the Advantages of DIY Kitchen Cabinet Installation?
When it comes to installing kitchen cabinets on your own, there are numerous benefits that might persuade you to take on the challenge. Let’s explore the pros of embarking on a DIY kitchen cabinet installation project:
- Cost Savings: One of the primary advantages is cost savings. By doing it yourself, you can avoid labor costs, which can be a significant portion of the budget for a kitchen remodel.
- Customization: DIY allows for more customization. You can choose the cabinet style, materials, and layout that perfectly fits your kitchen’s design and your personal preferences.
- Learning Experience: Installing cabinets can be a valuable learning experience. You’ll acquire new skills and knowledge that can be applied to future home improvement projects.
- Sense of Achievement: Completing a DIY project like this can bring a great sense of accomplishment. Every time you use your kitchen, you’ll take pride in knowing you did it yourself.
- Timeliness: Depending on your schedule, DIY projects can often be completed more quickly than hiring professionals. You can work at your own pace.
- Control Over Quality: You have full control over the quality of the work. You can ensure that every detail meets your standards.
- Budget Flexibility: DIY allows you to spread your budget across a longer period, making it more manageable and flexible.
- Personalization: You can personalize your kitchen cabinets with unique hardware, finishes, and features that suit your taste.
- Upcycling Possibilities: If you enjoy upcycling or repurposing materials, DIY kitchen cabinet installation can provide opportunities to recycle old cabinets or repurpose materials for an eco-friendly project.
- Increase Home Value: A well-executed DIY kitchen cabinet installation can add value to your home, which is a great return on investment.
In conclusion, embarking on a DIY kitchen cabinet installation journey offers a range of benefits, from cost savings and customization to personal satisfaction and increased property value. However, it’s essential to weigh these advantages against the challenges and complexities of the project to make an informed decision that suits your needs and skills.
Question 2: What Tools and Materials Are Required for DIY Kitchen Cabinet Installation?
Before you dive into DIY kitchen cabinet installation, it’s crucial to have the right tools and materials on hand. Here’s a comprehensive list of what you’ll need:
Tools:
- Measuring Tape: Accurate measurements are vital for a precise fit.
- Level: Ensure your cabinets are installed perfectly straight.
- Screwdriver and Drill: For securing cabinets to the wall and each other.
- Cordless Jigsaw: Useful for cutting holes for plumbing and electrical.
- Clamps: Keep cabinets aligned during installation.
- Safety Gear: Gloves, safety glasses, and ear protection are essential.
- Pry Bar: Helps remove old cabinets or trim.
- Stud Finder: Locates wall studs for secure cabinet anchoring.
- Table Saw or Circular Saw: Necessary for cutting cabinet materials.
- Sander: Smooth out rough edges and surfaces.
- Caulk Gun: For sealing gaps and joints.
- Screws, Nails, and Anchors: Various sizes for securing cabinets and mounting hardware.
Materials:
- Cabinets: Purchase pre-assembled or ready-to-assemble (RTA) cabinets.
- Cabinet Hardware: Handles, knobs, and pulls for doors and drawers.
- Plywood or Particleboard: For constructing cabinet bases and sides.
- Screws and Fasteners: Ensure they’re suitable for cabinet materials.
- Cabinet Backing: Often a 1/4-inch panel for cabinet backs.
- Shims: Used for leveling and aligning cabinets.
- Wood Glue: For extra cabinet joint strength.
- Finishing Materials: Paint, stain, or finish for cabinets.
- Countertops: Required if replacing or upgrading.
- Trim and Molding: Enhances the cabinet’s appearance.
- Cabinet Lighting: Optional but adds functionality and style.
- Mounting Hardware: Wall brackets, anchors, and screws for securing cabinets.
- Cabinet Feet or Legs: Optional for added aesthetics.
- Drawer Slides and Hinges: Ensure compatibility with your cabinet type.
Having the right tools and materials ready is the first step to a successful DIY kitchen cabinet installation project. It’s essential to double-check your measurements and gather everything you need before starting to ensure a smooth process.
Question 3: What Are the Steps for DIY Kitchen Cabinet Installation?
Embarking on a DIY kitchen cabinet installation project can be a rewarding endeavor, but it’s essential to follow a structured process to ensure success. Here are the key steps to guide you through the installation process:
Step 1: Planning and Design
- Measure your kitchen space carefully and create a detailed layout plan.
- Select the cabinet style, materials, and finishes that match your design preferences.
- Decide on the cabinet placement and layout to optimize storage and functionality.
Step 2: Gathering Materials
- Collect all the necessary tools and materials as outlined in the previous section.
- Ensure you have all the cabinet components, hardware, and accessories ready.
Step 3: Removing Existing Cabinets (if applicable)
- If you’re replacing old cabinets, carefully remove them, taking care not to damage walls or plumbing.
- Patch and repair any wall damage caused by the removal.
Step 4: Installing Base Cabinets
- Start by locating and marking wall studs.
- Secure a ledger board level along the base cabinet’s installation line.
- Begin installing the base cabinets, ensuring they are level, plumb, and aligned.
- Attach cabinets to each other and to the wall using screws and wall anchors.
- Use shims to adjust and level cabinets as needed.
Step 5: Installing Wall Cabinets
- Determine the height at which wall cabinets should be installed.
- Install a temporary support rail to hold the cabinets in place while you secure them to the wall.
- Attach wall cabinets to each other and to the wall using screws and wall anchors.
- Check for level and alignment.
Step 6: Installing Cabinet Hardware
- Drill holes for cabinet knobs and handles.
- Attach hardware to doors and drawers.
Step 7: Installing Countertops
- Measure and cut countertops to fit the space.
- Secure countertops to the base cabinets using screws or adhesive.
Step 8: Adding Finishing Touches
- Install crown molding, trim, and any additional decorative elements.
- Caulk gaps and joints for a seamless appearance.
Step 9: Final Adjustments
- Ensure all doors and drawers operate smoothly.
- Check for any remaining adjustments needed, such as leveling or aligning cabinets.
Step 10: Finishing and Cleanup
- Apply the chosen finish or paint to the cabinets.
- Clean up the workspace, removing any debris or tools.
Remember that DIY kitchen cabinet installation may vary depending on your kitchen’s specific layout and the type of cabinets you’re working with. Always consult the manufacturer’s instructions and consider seeking advice from experts or online tutorials if you encounter challenges along the way.
Question 4: What Are Some Common Challenges in DIY Kitchen Cabinet Installation?
While DIY kitchen cabinet installation can be a rewarding project, it’s not without its challenges. Here are some common difficulties you might encounter during the installation process:
- Uneven Walls: Walls may not always be perfectly straight, which can make it challenging to align and level cabinets. Shims and careful adjustments are often needed.
- Limited Space: Small kitchens can present logistical challenges when working with larger cabinets or multiple units. Careful planning is essential to maximize space.
- Plumbing and Electrical Obstacles: Existing plumbing and electrical fixtures can complicate cabinet installation. You may need to modify cabinets to accommodate these obstacles.
- Inaccurate Measurements: Even a small measurement error can lead to ill-fitting cabinets. Precise measurements are crucial.
- Matching Cabinet Finishes: If you’re installing new cabinets alongside existing ones, matching finishes can be tricky. It may require refinishing or painting to achieve a cohesive look.
- Cabinet Alignment: Achieving consistent alignment between cabinets, drawers, and doors can be challenging, especially if your walls aren’t perfectly straight.
- Complex Cabinet Types: Some cabinet styles, like corner cabinets or pull-out pantry units, can be more challenging to install due to their unique design and requirements.
- Heavy Lifting: Cabinets can be heavy, and lifting them into place safely can be physically demanding. It’s essential to have the right equipment and assistance if needed.
- Cabinet Leveling: Achieving a level installation is critical for both aesthetics and functionality. Inconsistent leveling can lead to doors and drawers that don’t close properly.
- Overlooking Safety Precautions: Safety should always be a priority. Ensure you use appropriate safety gear and tools to prevent accidents.
While these challenges are common in DIY kitchen cabinet installation, they are not insurmountable. Thorough planning, patience, and attention to detail can help you overcome these obstacles and achieve a successful cabinet installation. Don’t hesitate to seek assistance or advice from experienced DIYers or professionals if needed.
Question 5: What Are the Best Practices for DIY Kitchen Cabinet Installation?
To ensure a successful and hassle-free DIY kitchen cabinet installation, it’s essential to follow best practices and guidelines. Here are some expert tips to help you achieve professional results:
- Thorough Planning: Start by creating a detailed plan, including cabinet measurements, layout, and a timeline for the project. Proper planning will save time and minimize mistakes.
- Gather the Right Tools: Ensure you have all the necessary tools and materials before starting the project. This includes measuring tools, levels, drills, and safety equipment.
- Precise Measurements: Measure multiple times to ensure accuracy. Even a small measurement error can lead to ill-fitting cabinets.
- Wall Preparation: Check the condition of your walls and make any necessary repairs before installation. Remove old cabinets carefully to avoid damaging the wall.
- Leveling and Alignment: Use a level and shims to ensure that cabinets are level and aligned correctly. This is crucial for the overall appearance and functionality.
- Secure Cabinets Properly: Cabinets should be securely anchored to wall studs. Use the appropriate screws and fasteners for your cabinet materials.
- Follow Manufacturer’s Instructions: Pay close attention to the manufacturer’s installation instructions for your specific cabinet type. These instructions are essential for a successful installation.
- Cabinet Order: Install upper cabinets first and then lower cabinets to ensure proper alignment and ease of installation.
- Hardware Placement: Plan and mark the placement of cabinet hardware accurately before drilling holes. This ensures consistency and a polished look.
- Check for Plumbing and Electrical: Verify that cabinets won’t interfere with plumbing or electrical fixtures. Make any necessary adjustments to accommodate these obstacles.
- Quality Control: Inspect each cabinet, drawer, and door for proper operation before finishing the installation. Make any adjustments as needed.
- Finishing Touches: After installation, apply the chosen finish or paint to the cabinets. Install trim and molding to enhance the overall appearance.
- Safety First: Wear appropriate safety gear, including gloves, safety glasses, and ear protection, to prevent accidents.
- Seek Assistance if Needed: Don’t hesitate to ask for help if the project becomes overwhelming. Sometimes an extra set of hands can make a significant difference.
By following these best practices and maintaining attention to detail, you can ensure a smooth and successful DIY kitchen cabinet installation. Remember that patience and precision are key to achieving professional-looking results.
Question 6: Can I Install Kitchen Cabinets Over Existing Flooring?
One common question that arises during kitchen cabinet installation projects is whether it’s acceptable to install cabinets over existing flooring. Here’s what you need to know about this approach:
Pros of Installing Cabinets Over Existing Flooring:
- Saves Time and Money: Installing cabinets over existing flooring can save you the time and expense of removing and replacing the flooring.
- Preserves Flooring: If you have a high-quality or expensive flooring material, leaving it intact can help preserve its lifespan and appearance.
- Easier Installation: Installing cabinets on an existing floor can be easier, as there’s no need to worry about precisely matching the cabinet height to the new flooring.
Cons and Considerations:
- Height Issues: Installing cabinets over existing flooring can raise the overall height of your cabinets. Ensure this doesn’t interfere with appliances or create awkward countertop heights.
- Uneven Flooring: If your existing flooring is uneven, it can pose challenges during cabinet installation. Shimming may be necessary to level the cabinets.
- Future Flooring Changes: If you plan to replace the flooring in the future, it may be more complicated with cabinets already in place. This could lead to a gap between the new flooring and cabinets.
- Moisture Concerns: If you have a history of water leaks or moisture issues in the kitchen, it might be better to remove the flooring to address potential problems underneath.
- Aesthetics: The choice to install cabinets over existing flooring can affect the overall appearance of your kitchen. Ensure it aligns with your design goals.
In summary, it is possible to install kitchen cabinets over existing flooring, and it can offer certain advantages, especially in terms of time and cost savings. However, careful consideration of the factors mentioned above is crucial to ensure a successful installation that meets your functional and aesthetic requirements.
Question 7: How Can I Ensure Proper Cabinet Door Alignment?
Achieving precise cabinet door alignment is crucial for both the functionality and aesthetics of your kitchen. Here are some steps to help you ensure proper cabinet door alignment:
- Use Cabinet Hardware: Before attaching cabinet doors, install knobs, handles, or pulls. These serve as visual guides for alignment and make adjustments easier.
- Install Hinges Correctly: Pay close attention to the manufacturer’s instructions for installing cabinet door hinges. Accurate hinge placement is essential for proper alignment.
- Adjustable Hinges: Choose cabinets with adjustable hinges that allow for fine-tuning of door positioning. This is especially useful for achieving a uniform gap between doors.
- Shim as Needed: Use small shims behind hinge plates to adjust the position of the doors. This can help ensure that doors are level and evenly spaced.
- Check Vertical Alignment: To check if doors are vertically aligned, place a level along the edge of the door. Adjust hinges as necessary to achieve a straight vertical line.
- Check Horizontal Alignment: For horizontal alignment, ensure that the tops and bottoms of adjacent cabinet doors are level with each other. Adjust hinge screws to achieve this.
- Use a Spacer Block: To ensure consistent gap spacing between doors, use a spacer block of the desired thickness when installing each door. This creates uniform gaps.
- Test the Swing: Before fully tightening hinge screws, test the swing of the door. Ensure it opens and closes smoothly without rubbing against adjacent doors or cabinets.
- Check for Overlapping: Verify that doors do not overlap when closed. They should meet evenly in the center without any gaps or overlapping edges.
- Final Inspection: Once all doors are installed, conduct a final inspection to ensure uniformity and alignment. Make any necessary adjustments.
- Cabinet Adjustment: If you encounter issues with multiple doors not aligning correctly, you may need to adjust the entire cabinet frame for proper door alignment.
- Patience and Precision: Achieving perfect cabinet door alignment may require patience and fine-tuning. Take your time to make precise adjustments.
By following these steps and paying close attention to detail, you can ensure that your cabinet doors are properly aligned, creating a polished and functional kitchen space.
Question 8: Should I Choose Ready-to-Assemble (RTA) Cabinets for My DIY Project?
When considering DIY kitchen cabinet installation, one crucial decision is whether to opt for Ready-to-Assemble (RTA) cabinets or pre-assembled cabinets. Let’s explore the pros and cons of RTA cabinets to help you make an informed choice:
Pros of RTA Cabinets:
- Cost-Effective: RTA cabinets are generally more affordable than pre-assembled cabinets because you’re not paying for labor costs.
- Ease of Transport: Since RTA cabinets come in flat-pack boxes, they are easier to transport and maneuver, making them ideal for DIYers.
- Customization: Many RTA cabinet suppliers offer a wide range of styles, finishes, and configurations, allowing you to customize your kitchen design.
- Space-Saving: Flat-pack cabinets take up less space during storage and transportation, which can be advantageous if you have limited space.
- DIY-Friendly: RTA cabinets are designed for DIY installation, with pre-drilled holes and assembly instructions.
Cons and Considerations:
- Assembly Required: As the name suggests, RTA cabinets require assembly. While this can be a DIY-friendly process, it does take time and effort.
- Skill Level: Assembling RTA cabinets requires a basic level of DIY skills and tools. Complex designs may be more challenging for beginners.
- Quality Varies: The quality of RTA cabinets can vary between suppliers. Research and read reviews to ensure you choose a reputable brand.
- Warranty: Check the warranty offered by the RTA cabinet manufacturer. It may differ from warranties for pre-assembled cabinets.
- Time-Consuming: While RTA cabinets can be cost-effective, assembly can be time-consuming. Factor this into your project timeline.
In summary, RTA cabinets are an excellent choice for DIY enthusiasts looking to save on costs, customize their kitchen design, and tackle the installation themselves. However, be prepared for the assembly process and choose a supplier with a good reputation for quality.
Question 9: How Can I Maximize Kitchen Storage in a Small Space?
Optimizing kitchen storage in a small space is a common challenge, but with the right strategies, you can make the most of your kitchen’s square footage. Here are some tips for maximizing storage efficiency:
- Use Vertical Space: Install tall cabinets that reach the ceiling to utilize vertical space effectively. Use the upper shelves for items you rarely use.
- Pull-Out Shelves and Drawers: Incorporate pull-out shelves and drawers inside cabinets to maximize accessible storage and make it easier to reach items at the back.
- Corner Cabinets: Utilize corner cabinets with Lazy Susans or pull-out trays to make the most of corner spaces, which can be challenging to access.
- Under-Cabinet Storage: Install hooks, racks, or magnetic strips under cabinets to hang utensils, pots, and pans, freeing up drawer and counter space.
- Open Shelving: Open shelves can create an open and airy feel while providing storage for dishes, glassware, or decorative items. Keep it organized for a neat appearance.
- Pegboard: Install a pegboard on a kitchen wall for versatile storage. Use hooks and pegs to hang pots, pans, utensils, and even small appliances.
- Cabinet Organizers: Invest in cabinet organizers, such as pull-out spice racks, tray dividers, and utensil trays, to keep cabinets tidy and organized.
- Drawer Dividers: Use dividers in drawers to separate and organize utensils, cutlery, and kitchen gadgets efficiently.
- Over-the-Door Storage: Over-the-door organizers or racks can hold pantry items, cleaning supplies, or small kitchen tools.
- Multi-Functional Furniture: Choose kitchen furniture with built-in storage, like kitchen islands or tables with shelves or drawers.
- Downsize and Declutter: Regularly assess your kitchen items and consider donating or discarding items you no longer need or use. Less clutter means more space.
- Wall-Mounted Magnetic Strips: Attach magnetic strips to the kitchen wall for knives and metal utensils, keeping them within easy reach.
- Use Transparent Containers: Store pantry items in transparent containers or jars to easily see what’s inside and maintain a neat appearance.
- Custom Shelving: Consider custom shelving solutions that cater to your specific kitchen layout and storage needs.
- Built-In Appliances: Opt for built-in appliances to save counter and cabinet space while maintaining a streamlined look.
With these storage optimization strategies, you can transform your small kitchen into a functional and organized space that maximizes every inch of available storage.
Stay tuned for more insights into the world of DIY kitchen cabinet installation as we continue to address your questions and concerns.
Question 10: What Are Some Eco-Friendly Practices for DIY Kitchen Cabinet Installation?
If you’re environmentally conscious, there are several eco-friendly practices you can adopt during your DIY kitchen cabinet installation to reduce your carbon footprint. Here are some eco-friendly tips:
- Choose Sustainable Materials: Opt for cabinets made from sustainable materials, such as bamboo, reclaimed wood, or FSC-certified (Forest Stewardship Council) lumber.
- Low-VOC Finishes: Select low-VOC (Volatile Organic Compounds) or no-VOC paints, stains, and finishes to reduce harmful emissions and indoor air pollution.
- Recycled Hardware: Consider using recycled or upcycled hardware for your cabinets, such as antique handles or knobs.
- Energy-Efficient Lighting: If you’re adding cabinet lighting, choose energy-efficient LED fixtures to reduce energy consumption.
- Reuse and Repurpose: If possible, reuse existing cabinets or materials from other projects to reduce waste and save resources.
- Recycle Old Cabinets: If you’re replacing old cabinets, recycle or repurpose them instead of sending them to the landfill.
- Energy-Efficient Appliances: If you’re upgrading appliances as part of your kitchen remodel, opt for energy-efficient models that save both energy and money.
- Proper Disposal: Dispose of construction waste responsibly by recycling materials like wood, metal, and glass.
- Local Materials: Whenever possible, source materials locally to reduce transportation emissions.
- Water Efficiency: Consider installing low-flow faucets and a water filter to reduce water waste in the kitchen.
- Compost Bin: Set up a composting system for kitchen scraps and organic waste, reducing the amount of waste sent to landfills.
- Donate Unwanted Items: Donate usable but unwanted kitchen items, like old cabinets or appliances, to local charities or reuse centers.
- Energy-Efficient Windows: If your kitchen remodel includes window replacement, choose energy-efficient windows with high insulation values.
- Proper Insulation: Ensure that your kitchen is well-insulated to minimize energy consumption for heating and cooling.
- Solar Panels: If feasible, consider installing solar panels on your home to generate clean, renewable energy.
By implementing these eco-friendly practices, you can make your DIY kitchen cabinet installation project not only aesthetically pleasing but also environmentally responsible. Reducing waste, conserving resources, and choosing sustainable materials are all steps towards a greener kitchen and home.
Thank you for joining us on this journey through the world of DIY kitchen cabinet installation, from the advantages of going the DIY route to eco-friendly practices. We hope these insights have been valuable in guiding your kitchen remodeling project. If you have more questions or need further assistance, don’t hesitate to reach out to DIY experts or professionals in the field. Happy remodeling!
